How To Use A Soil Warming Cable
Soil warming cables provide controlled heat beneath propagation trays, pots and growing areas, helping create suitable conditions for seed germination and propagation.
Elixir Soil Warming Cables are designed for use on greenhouse benches, in cold frames and with indoor propagators. The cables are water and moisture resistant and produce constant heat, so the temperature should be monitored and controlled using a thermostat.
This guide explains how to install and use the cables correctly, how to calculate the cable length you need and how to use the Elixir Soil Warming Thermostat.
Quick Answer
To use a soil warming cable:
- Build a suitable propagation bed or frame
- Line the base with heavy-duty polythene
- Add approximately 50mm of damp sharp sand
- Lay the cable evenly across the sand
- Keep the cable runs approximately 80mm apart
- Cover the cable with another 50mm layer of damp sharp sand
- Place pots or seed trays on top
- Connect the cable to a suitable thermostat
- Set the required temperature and monitor the growing area
Never allow the cable to cross over itself, and do not use a cable that is broken, damaged, cut or creased.

Choosing The Right Cable Length
| Cable Length | Wattage |
|---|---|
| 3m | 27W |
| 6m | 50W |
| 12m | 82W |
| 24m | 200W |
| 48m | 250W |
Calculate The Cable Length
Step 1 Build The Propagation Bed
Our Elixir instruction manual recommends constructing a simple frame using wooden boards.
The board size should be based on the length of cable being used, with boards approximately 15mm thick.
Line the inside of the frame with heavy-duty polythene before adding the sand.
Step 2 Add The First Layer Of Sand
Cover the base with approximately 50mm of damp sharp sand.
The sand provides the medium in which the heating cable is positioned and helps distribute the heat across the propagation bed.
Keep the sand evenly moist. The instructions warn that dry patches can cause uneven heat distribution and may burn the cable.
Step 3 Lay The Soil Warming Cable
Lay the cable evenly across the sand.
The recommended spacing between cable runs is approximately 80mm according to the installation instructions.
For shorter beds, the cable can be laid in a back-and-forth pattern. For longer beds, it can be arranged in a longer continuous layout.
Do not allow the cable to cross over itself.
The cable should also not be stressed, cut, creased or damaged.

Step 4 Cover The Cable
Once the cable has been positioned correctly, cover it with a further 50mm of damp sharp sand.
This creates the finished heated propagation bed.
Place pots or seed trays onto the sand and pack between them with damp peat to help retain heat, as recommended in the Elixir instructions.
Step 5 Connect A Thermostat
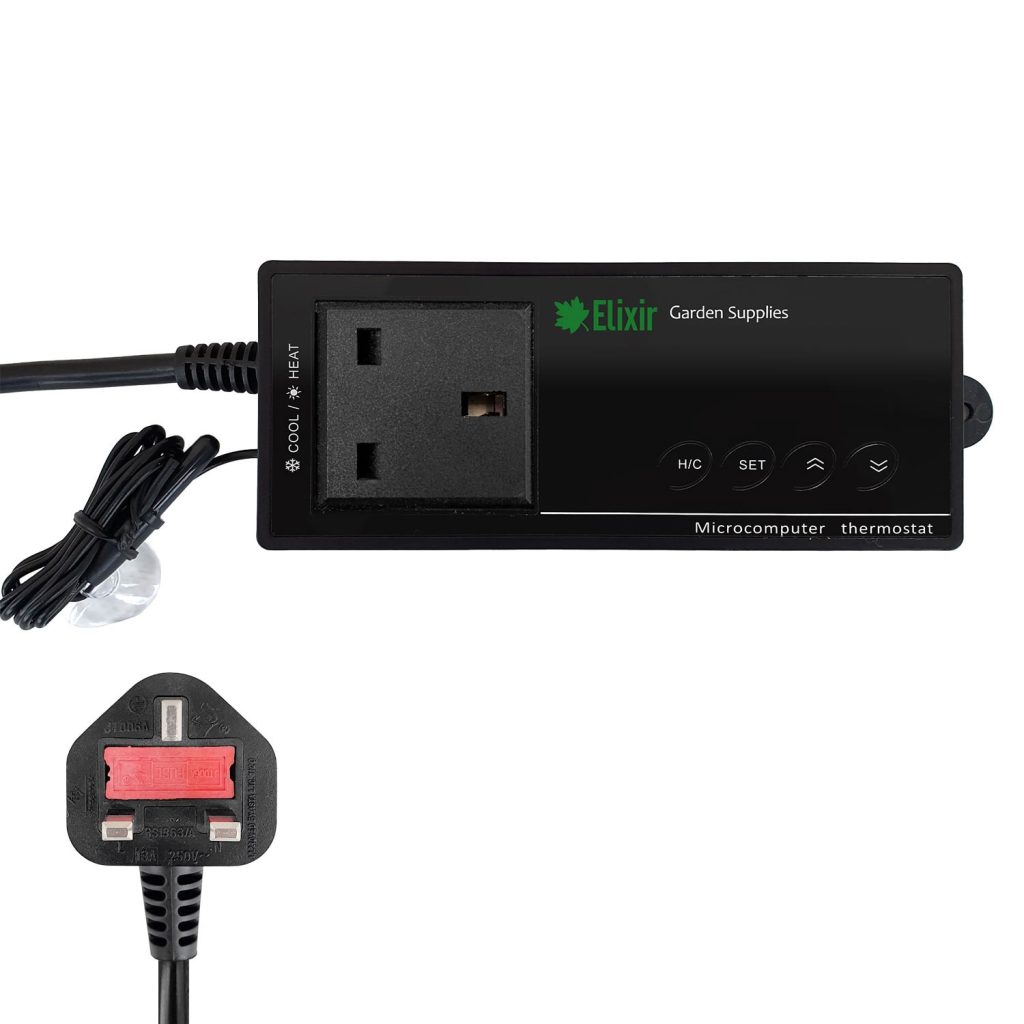
Because the soil warming cable produces constant heat, we recommend controlling the temperature with a thermostat.
The Elixir Soil Warming Thermostat provides temperature control from 16°C to 40°C, with a resolution of 0.1°C and accuracy of ±1.0°C.
It features an LED display and allows the temperature to be adjusted without additional wiring. The thermostat also has heat and cool modes and a °C/°F switch.
Step 6 Set The Temperature
To set the required temperature on the digital thermostat:
- Press the SET button.
- Use the UP and DOWN buttons to adjust the temperature.
- The temperature can be adjusted in 0.1°C increments between 16°C and 40°C.
- Press the SET button again to save the setting and exit.
The thermostat manual also includes adjustable temperature difference and delay settings. For straightforward propagation use, the important starting point is to set the required temperature for your application and allow the thermostat to control the cable.
Step 7 Monitor The Propagation Bed
The instructions recommend monitoring the temperature and keeping the sand evenly moist.
The temperature achieved will depend on several factors, including the surrounding air temperature and how the cable is positioned.
The supplied instructions give an example that when the greenhouse is maintained at around 7°C (45°F), the propagation bed may reach approximately 18–21°C (65–70°F) with the cables running correctly.
In colder conditions, the instructions state that the cables may need to be positioned closer together, without allowing the cable to touch or cross itself.
Soil Warming Cable Safety
The supplied instructions contain several important warnings:
- Use the cable with a suitable Residual Current Circuit Breaker (RCCB) and do not bypass it
- Do not cut, crease, cross or damage the cable
- Do not plug the cable into the mains while it is coiled
- Do not use cable clamps to hold the green heating element, as this can distort the cable and cause failure
- Do not bury the heating element in anything other than soil, compost or sand
- Do not use a cable that is broken, damaged or porous
- Do not cover the cable with heat sensitive material while it is operating
- Keep the product away from children
The cable is rated IP67 and is designed for a 220–240V AC mains supply.
Common Mistakes to Avoid
- Using the wrong cable length, calculate the growing area before choosing a cable
- Spacing the cable runs too closely, the recommended spacing is approximately 5–8cm, with the installation instructions showing approximately 80mm between runs
- Allowing the cable to cross itself, the cable must be laid without overlapping
- Using dry sand, the instructions state that dry patches can cause uneven heat distribution and may burn the cable
- Running the cable without temperature control, the cable produces constant heat, so Elixir recommends using a thermostat
- Plugging the cable in while it is coiled, always lay the cable out correctly before connecting it to the mains
- Cutting or damaging the cable, never cut, crease or use a damaged cable
- Using the wrong material around the cable, the heating element should only be buried in soil, compost or sand
Soil Warming Thermostat
Best For: Controlling the temperature of Elixir soil warming cables for propagation and germination.
Why Choose This Product: It provides adjustable temperature control from 16°C to 40°C, with 0.1°C resolution and ±1.0°C accuracy.
Recommended When: You want to regulate the temperature of a soil warming cable rather than allowing it to run at a constant uncontrolled temperature.
Soil Warming Cable
Best For
Propagating seeds and cuttings where consistent warmth can help create suitable growing conditions. The soil warming cable is suitable for use in greenhouses, propagation beds, cold frames and indoor propagators, with lengths available from 3m to 48m.
Why Choose This Product
The cable provides a practical way to introduce controlled heat into a propagation bed or growing area. It can be laid beneath seed trays and pots to provide even warmth across the prepared bed, helping create a more suitable environment for germination and propergation.
Recommended When
Choose a soil warming cable when you are:
- Propagating cuttings
- Using a greenhouse or cold frame for propagation
- Creating a heated propagation bed

Horticultural Sand
Best for: Improving drainage and aeration in soils, compost mixes and lawns.
Why choose this product: Elixir Horticultural Sand helps create a freer-draining growing medium, improves soil texture and supports healthy root development. It is ideal for mixing into seed and cutting compost or breaking up heavy soils.
Recommended when: Preparing compost for seeds and cuttings, improving poorly drained or compacted soil, creating specialist potting mixes, or enhancing lawn drainage.

Summary
Soil warming cables provide a practical way to create a controlled heated propagation area for seeds and cuttings.
The most important points are to choose the correct cable length, use approximately 50mm of damp sharp sand beneath and above the cable, maintain suitable spacing between cable runs, prevent the cable from crossing itself and control the temperature with a thermostat.
For a simple propagation setup, the Elixir Soil Warming Cables and Soil Warming Thermostat can be used together to provide controlled soil temperatures for propagation and germination.
Shop Elixir Soil Warming Cables
Shop Elixir Soil Warming Thermostat
Installation Manuals
Frequently Asked Questions
How far apart should soil warming cables be?
Elixir recommends cable runs approximately 5–8cm apart. The installation instructions show approximately 80mm spacing. Smaller gaps create a higher temperature.
How deep should soil warming cables be?
The recommended setup uses approximately 50mm of damp sharp sand below the cable and another 50mm above it.
Do soil warming cables need a thermostat?
Elixir recommends controlling the constant heat produced by the cable with a thermostat. The Soil Warming Thermostat provides a control range of 16°C–40°C.
What size soil warming cable do I need?
Elixir supplies cables from 3m to 48m. Calculate the required length from the dimensions of your growing area, then select the closest suitable cable length.
Can soil warming cables be used in a greenhouse?
Yes. Elixir specifically describes the cables as suitable for propagation on a greenhouse bench or in a cold frame.
Follow the Instructions
Every gardening product is designed to be used in a specific way. Always read the product label and follow the manufacturer’s instructions before use. Correct preparation, application and timing help ensure the best possible results while promoting safe and responsible use.
Wear Appropriate PPE
Some products may require suitable personal protective equipment (PPE) during handling or application. Depending on the product, this may include gloves, eye protection or protective clothing. Always check the product label to determine the recommended safety precautions before use.
Application Rates
Using more product than recommended will not usually improve performance and may lead to unnecessary waste or undesirable results. Measure accurately, apply evenly and follow the recommended application rates and guidance provided on the product label.
Rhys Nield
As one of our resident product experts, Rhys has spent the last 2 years helping keen gardeners and growers from within our customer services department. Remember to save this page, or visit the Advice Centre, for the latest tips, articles, and expert knowledge, to help you make your garden the best it can be.



About Elixir Gardens Supplies
For over 35 years Elixir Garden Supplies have been providing gardeners with all the essentials they need to achieve growing.
Our online store makes sure that all our customers have access to the information they need to make the right decisions when choosing the products they need for their gardens. We know from experience that gardening means many different things to our customers. Whether you have a balcony, patio, lawn or allotment, Elixir Gardens are proud to supply both amateur and professional gardeners alike.
We regularly use our many years of experience to developed our exclusive formulations in specialist fertilisers. Many of these have stood the test of time and have become firm favourites with amateurs and professionals alike. In fact our knowledge of fertilisers, feeds and garden care is well known within gardening circles. But don’t just take our word for it, why not check out the thousands of fantastic reviews on Trustpilot.
